Step-by-Step Guide
Scratch-off Panels are the electronic equivalent of the panels you rub off a scratchcard. They use ActivInspire's Magic Ink special effect - an annotation ink that hides anything it covers in the Top Layer, revealing whatever is in the Layers below. (ActivInspire uses a Top, Middle and Bottom Layer to help organise the various objects on a page. You can see this in the Object Browser ![]() .)
.)
Setting Up
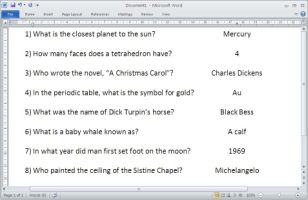
First you need to add to the flipchart the hidden objects - the words (or pictures!) you want revealed by the scratch-off panels. If using words, you might find it easier to write the text in something like a Word document and copy it into ActivInspire:
- Enter the text in the word processor.
- Select it all (Ctrl+A usually works).
- Copy and Paste it onto the ActivInspire flipchart.
- This should give you one text object, which is usually easier to handle than several separate objects. You'll probably lose some of the formatting, such as spacing, but this can be fixed with some editing.
 |
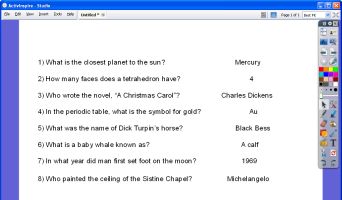 |
| Before: The quiz has been typed in Word. | After: Pasted into ActivInspire, the quiz needed some editing to put back the lost spacing. |
Equally, you could import a PDF or PowerPoint presentation (File>Import), if they contain the things you want covered and revealed.
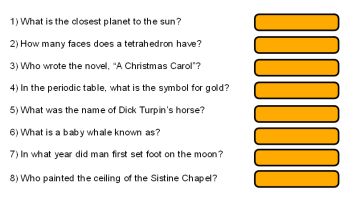
Second, you need to add the scratch-off panels. These might be simple Shapes, but you could load in pictures instead. If using shapes:
- Press the Shape icon
 on the toolbar.
 - Select an appropriate shape, such as Rounded Rectangle.
- Draw out the shape to the appropriate size (it's usually a good idea to draw it over the object you want to hide). Resize and reposition if necessary.
- Either repeat for each hidden object, or Duplicate (Ctrl+D) the first shape to produce identical scratch-off panels.
- Drag them all into position.
- You can use the options on the Edit > Align menu to help line up the panels.
 |
|
The rectangles have been aligned by selecting them all (easy to do in the Object Browser) then selecting Edit > Align > Align Centre X from the menu. |
Finally, you should lock everything into place - otherwise you could just drag the covers off the hidden objects, or drag the objects out from behind the scratch-off covers, which rather defeats the object:
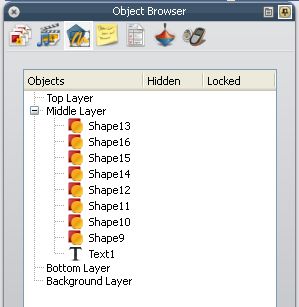
- Bring up the Browsers window if it's not already visible (Ctrl+B).
- Click on Object Browser
 .
. - Check all your hidden objects are on the Middle Layer or lower (i.e. not on the Top Layer). If any aren't, just click and drag them into one of the lower layers.
- Check all your scratch-off panels are on the Top Layer - by default, they probably aren't. Click and drag them to the Top Layer.
- To lock all the objects, click on the top object, hold down Shift on the keyboard and click on the bottom object. Now press Ctrl+Shift+L on the keyboard.
- A padlock should appear next to each locked object.
- If you miss one, you can lock a single object by double-clicking in the Locked column next to that object and select Lock.
 |
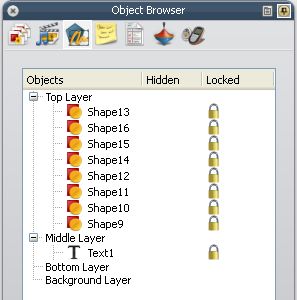 |
| Before: The Text object is fine on the Middle Layer, but the Shape objects must be moved to the Top Layer. | After: The Shapes have been moved and everything has been Locked. |
How to Use
Magic Ink can be selected from the Tools menu, or by pressing Ctrl+Shift+M.
"Draw" over the scratch-off panels using the Magic Ink to reveal the hidden objects.
Magic Ink acts like any other annotation on ActivInspire - you can erase it, move it, etc.
Note: the first time you use Magic Ink, it will probably be set to a large size (shown by the dotted rectangle), which might wipe off the scratch-off panels too quickly. Reduce the size using the size selector on the toolbar.![]()
