Step-by-Step Guide
Any object, be it an image, text, shape or annotation, can have a caption (what ActivInspire calls a Label) attached to it. And it's really easy to set up.
This is only really suitable for short lines of text, as the caption can only appear on a single line; enter something too long, and it will look a bit odd.
Another downside to captions is they are easy to move, and there's no way to lock them down once you have them where you want them (in relation to the object they're attached to).
Setting Up
- Select the object you want to add the label to.
- Press F9 on your keyboard to bring up the Property Browser
 .
. - Locate the Label group of properties. If it's closed, click the small plus to the left to open it so you can see all the properties.

If the property group is closed, click the plus sign... 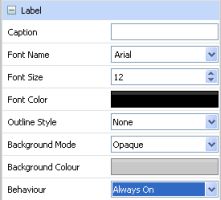
...to open it and reveal all the properties. - Enter the text you want in the Caption property. Make sure you press Return/Enter on the keyboard to store the text.
- You can change the appearances of the text using the next three properties: Font Name, Size and Colour.
- You can change the background of the caption using the next three properties: Outline, Background Mode and Colour.
- The Behaviour setting determines whether the caption is always visible (Always On) or only appears when the mouse/pen is over the object (Tooltip).
- Finally, you can change the position of the caption, relative to the object, by clicking on it and dragging it. However, the caption is limited in how far away it can be moved from the object.
Last modified: Friday, 28 September 2012, 12:30 PM