Step-by-Step Guide: Camouflage Revealers
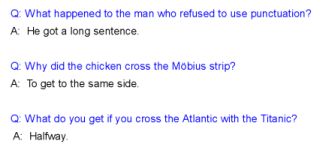
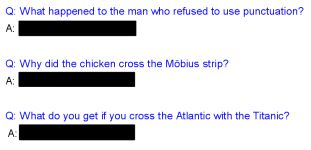
This type of revealer is an optical illusion that takes advantage of camouflage and the order objects appear on a page. (You can create a similar effect in Word, albeit less visually effective.)
This method has some disadvantages from the Magic Ink Revealer: the effect is best used on plain, single colour backgrounds; it can only be used to reveal plain text, not images.
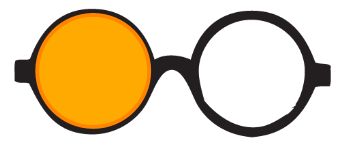
One small advantage over the Magic Ink Revealer is that the revealing "lens" itself can be coloured, making it look more like a "decoder gel" used to find secret messages (the Magic Ink lens is always transparent).
Note: Steps 4 and 6 are optional - you can still get the effect without a fancy frame around the revealing "lens", but a frame finishes the effect nicely. You don't actually have to create a revealer yourself either - you can re-use the ones in the Example file. You'll still need to follow steps 1-3 below to set up your page then, instead of steps 4-6, load in the Revealer you want to use. Examples of how are shown below. Finally, follow steps 7-8 to check everything is where it should be.
Setting Up
- Create the text containing the words you want to reveal. As with Scratch-off Panels, this can be created in something like Word, then copy and pasted in. This way you end up with a single Text object, rather than loads (which can be a good or bad thing, depending on how much you like to fiddle with the layout).

- Draw shapes
 over all the text that is to be revealed. Important: the shapes must be the same colour as the text - ultimately, the text will be on top of the shapes, but camouflaged by them.

- Group the text and shapes together so they cannot be dislodged. Select the text and all the covers, then click on the Group icon
 that appears in the pop-up marquee icons.
 - OPTIONAL: Find a "Frame" for the revealer. You can use any image as long as it has a transparent "hole" cut into it - and it must be transparent; a colour, such as white or black, isn't any good. You can follow these tips on removing background colours from images. Otherwise, ActivInspire has a couple of good examples: a pair of glasses and a magnifying glass. These can be found in Shared Resources > Lesson Building Tools > Gadgets. They are actually called "Revealers", although they don't actually do anything on their own!
- Create the revealer "Lens". This is the part that will do the revealing bit. It's just a Shape that is a contrasting colour to the text it will be revealing. If you're using a Frame, it should also be roughly the same size and shape of the window in the Frame. It can be slightly bigger than the window, but smaller than the frame itself - it will all be neatened up in step 8.

- OPTIONAL: If you're using a Frame, group it with the Lens, just as you grouped the text and covers in Step 3.
- Open the Object Browser
 . Click Ctrl+B to open the Browsers window if it isn't already open, then click on the Object Browser icon.
 - Move everything into the correct order / onto the correct Layer. This is the bit you need to get right to make the illusion work. See the table below to see what should go where. Hint: To make it easier to identify what's what in the Object Browser, it's a really (really!) good idea to rename the objects from things like "Shape01", "Text01", etc., to something meaningful, like "Frame", "Lens", "Top cover", etc. Just double click the text of an object in the Object Browser and rename it. You'll thank yourself later.
| Object | Where it should go |  |
| Frame | If you're using one, this should be at the highest order position - put it on the Top Layer. | |
| Text | Put this in the Top Layer as well, but below the Frame if you're using one. | |
| Lens | Put this in the Top Layer as well, but below the Text. | |
| Covers | These need to be in the lowest order position on the page - put them on the Middle Layer. |
It doesn't matter if the objects are all on the same layer, as long as they are in this order.
How to Use
Just click and drag the revealer over the covers. It will slide between the text and the covers, and the contrasting colour will reveal the text. It's a simple, but effective, illusion.

Reusing Your Revealer
You can save the revealer for use in other flipcharts by doing the following:
-
Open the Resources Browser
 . (Ctrl+B opens the Browser window if it isn't already open.)
 -
Click on My Resources
 to open your personal files area.
 -
Click on the My Graphics folder.
-
Drag the revealer from the flipchart page onto the libray files in the bottom half of the browser.
-
Rename the file. After the revealer has appear in your personal library, right-click on it and select "Rename Resource File". If you don't do this, you'll find everything has been named, "Resource", which isn't too helpful.
Now you've saved your revealer, you can load it in to another flipchart:
-
Open the "My Graphics" folder. (Follow Steps 1-3 above.)
-
Locate the revealer in the library files.
-
Click and drag it onto the page.
-
Adjust the order / Layer as needed. By default, the revealer should appear at the top of whatever Layer it was saved from. You will need to move it (or just the Lens part, if using a Frame) in the Object Browser to a position below the Text for it to work properly.
